EdgeRider Wheels for APQS Ultimate 1 / Millennium / Liberty / Freedom / Discovery Old Style Channel Lock Quilting Machines
Our wheels for the APQS machines with old style channel lock represents years of engineering and testing by our company and customers like you. Our wheels were designed specifically for each machine and its track system, not reused from another industry. These wheels are manufactured with strict tolerances and are used by thousands of customers.
Where to buy
 You can only purchase EdgeRider Wheels for APQS Quilting Machines through our authorized dealers. If they do not have the authorized dealer logo they are not selling you the Genuine EdgeRider Wheels. View the list of our dealers and contact them to purchase your set.
About APQS
![]() American Professional Quilting Systems (APQS) longarm quilting machines combine aircraft aluminum with state-of-the-art electronics to provide ultra light construction & effortless operation. APQS was the 1st to introduce motorized fabric advancement, automatic needle positioner, automatic bobbin thread cutter, a working stitch-regulator which is now called PerfectStitch. Click the logo to visit the APQS website.
American Professional Quilting Systems (APQS) longarm quilting machines combine aircraft aluminum with state-of-the-art electronics to provide ultra light construction & effortless operation. APQS was the 1st to introduce motorized fabric advancement, automatic needle positioner, automatic bobbin thread cutter, a working stitch-regulator which is now called PerfectStitch. Click the logo to visit the APQS website.
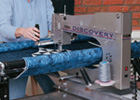
APQS Discovery
APQS Freedom
APQS Liberty
APQS Millennium
APQS Ultimate I
Installation Instructions for APQS Old Style Channel Lock Machines
PARTS THAT COME WITH THE KIT
- 8 - white wheels with bearings
- 26 - small washers
- 8 - large washers
- 4 - 1 ½ inch bolts (brass color), 1/4"-28
- 4 - 1 ¾ inch bolts (brass color), 1/4"-28
If you are missing any parts from your kit contact your dealer or us directly at support@edgeriderwheels.com. Most bolts can be purchased from a hardware store and in most cases your original bolts can be reused as well.
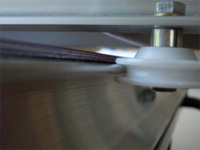
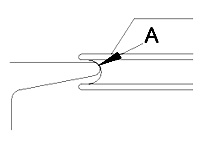 When installing the wheels make sure that they are aligned with hubs on the top as the drawing shows. The wheels should be pushed against the rails, so they touch the edges at point "A". Note that there is a gap between the top of the rail and the rim of the wheel.
NOTE: The EdgeRider wheels are about 1/4" higher than the original ones. Most machines will benefit from this added height, however, if you used additional spacers to adjust for attachments (e.g. Hartley fence), you will need to remove 1/4" worth of additional spacers to provide the same alignment.
ON THE MACHINE
Stitch Regulated Models
 On the machine head, start the installation with the wheel on the arm that has the speed sensor. Remove the wheel and sensor. Using the 1-¼” bolt, place one washer on the bottom and one on top of the wheel then the speed sensor. Right front wheel (viewed from front of machine) – use 1-1/4” bolt with one spacer on bottom and 2 spacers on top. For the wheels with the adjusting cams, you will use the 1-1/2” bolts with one washer on the bottom of wheels and 1 small and 1 large washer on top. Do not replace the large original spacer, the bolt is not long enough. Set the wheels on the rail first, then insert the bolts.
Non-Regulated Models
Start the installation with the brackets on the arm. Support the arm with spacers at the current height. Install the wheels on the right side (viewed from the front) using the 1-1/4" bolts. MAKE SURE THAT YOU PUT ONELARGER WASHER ON THE TOP AND ONE SMALL WASHER ON THE BOTTOM OF EACH WHEEL. Put any additional/original washers/spacers on the top of the wheel. Set the wheels on the rail first, than insert the bolts. Tighten the bolts, but do not over-tighten them.
Install the wheels on the adjustable side using the 1-1/2" bolts. MAKE SURE THAT YOU PUT ONE LARGE WASHER ON THE TOP AND ONE SMALL WASHER ON THE BOTTOM OF EACH WHEEL. Put any additional/original washers/spacers on the top of the wheel.
If you have the eccentric bolts, turn them to the widest position. If there is a slot provided for adjustment, pushthe bolt gently toward the machine.
After installing all four wheels, adjust the wheel positions. The dual ball bearing design makes it possible to pushthe wheel all the way against the rails, without compromising easy rolling. After the alignment check if all fourwheels are positioned as the drawing above shows.
ON THE CARRIAGE
Stitch-Regulated Models
 On the carriage wheels start with the bar on the back that contains the speed sensor. Support the carriage at the current height. Remove the whole bar by removing the 2 bolts that hold the bar on the bottom of the carriage.
Replace the wheel on the sensor end. PUT THREE WASHERS UNDER AND ONE LARGE WASHER ON THE TOP OF THE WHEEL. Adjust the height of the sensor roller if necessary. Replace the wheel on the other side of the bar with ONE LARGE WASHER ON TOP AND ONE SMALL WASHER ON THE BOTTOM.
Install the wheels on the front using the 1-1/2" bolts. MAKE SURE THAT YOU PUT ONE LARGE WASHER ON THE TOP AND ONE SMALL WASHER ON THE BOTTOM OF EACH WHEEL. Put any additional/originalwashers/spacers on the top of the wheel. If you have the eccentric bolts, turn them to the widest position. If thereis a slot provided for adjustment, push the bolt gently toward the table.
Non-Regulated Models
 Support the carriage at the current height. Remove the rear wheels. Install the rear wheels using 1-1/4" bolts. Remember PUT ONE LARGE WASHER ON THE TOP AND ONE SMALL WEASHER ON THE BOTTOM OF EACH WHEEL. Put any additional/original washers/spacers on the top of the wheel. Tighten the bolts, avoiding over-tightening. The new bolt supplied by us is much stronger than the aluminum frame.
Install the wheels on the front using the 1-1/2" bolts. MAKE SURE THAT YOU PUT ONE LARGE WASHER ON THE TOP AND ONE ON SMALL WASHER THE BOTTOM OF EACH WHEEL. Put any additional/originalwashers/spacers on the top of the wheel. If you have the eccentric bolts, turn them to the widest position. If thereis a slot provided for adjustment, push the bolt gently toward the table.
After installing all four wheels, adjust the wheel positions. Push the wheels all the way against the rails. After thealignment, check if all four wheels are positioned as the drawing above shows.
NOTE: Slight misalignments or uneven surfaces may cause the wheels to roll tighter at spots. In these cases youwill need to loosen up the wheel alignment until the tight spots disappear.
It is recommended to clean the edges of the rails with alcohol before the installation and as a regular maintenance to avoid aluminum oxide buildup on the wheels.