EdgeRider Wheels for
HQ Sixteen Quilting Machines
Our wheels for the HandiQuilter 16 quilting machines represent years of engineering and testing by our company and customers like you. Our wheels were designed specifically for each machine and its track system, not reused from another industry. These wheels are manufactured with strict tolerances and are used by thousands of customers.
Where to buy
 You can only purchase EdgeRider Wheels for APQS Quilting Machines through our authorized dealers. If they do not have the authorized dealer logo they are not selling you the Genuine EdgeRider Wheels. View the list of our dealers and contact them to purchase your set.
About HandiQuilter
![]() Handi Quilter systems are simply the best home machine quilting systems available. Whether you're a beginning quilter or advanced, starting a business of your own or simply finishing quilts for your kids or grandkids, Handi Quilter Company has a system for you. As the creator of the first portable home machine quilting frame, we have implemented our years of quilting experience to create a complete line of quilting machines, home machine quilting frames, and quilting gadgets perfect for any quilter.
Handi Quilter systems are simply the best home machine quilting systems available. Whether you're a beginning quilter or advanced, starting a business of your own or simply finishing quilts for your kids or grandkids, Handi Quilter Company has a system for you. As the creator of the first portable home machine quilting frame, we have implemented our years of quilting experience to create a complete line of quilting machines, home machine quilting frames, and quilting gadgets perfect for any quilter.
Installation Instructions for HQ Sixteen Quilting Machines
PARTS THAT COME WITH THE KIT
- 4 - sliding hub wheels (remove tape)
- 4 - fixed hub wheels
- 20 - thin washers (8 extra washers)
On some machines additional washers are needed when wheels are too close to the body or carriage. Place even number of spacers on the same side. - 8 - 1 ¼ inch bolts (2 left over if installing on stitch regulated machine)
- 2 - 1 ½ inch bolts (left over if no stitch regulator)
- 2 - ¼-20 Lock nut (left over if no stitch regulator)
TERMINOLOGY
- Sliding hub wheel – wheel that comes with tape on the center (remove) that has a sliding center sleeve
- Fixed hub wheel – wheel where center does not move in out, does not extend beyond bearings
If you are missing any parts from your kit contact your dealer or us directly at support@edgeriderwheels.com. Most bolts can be purchased from a hardware store and in most cases your original bolts can be reused as well.
 INSTALLING THE WHEELS ON THE MACHINE
To make the installation easier, remove the machine from the carriage.
Remove the left front wheel. Install the EdgeRider wheel without the sliding hub using the 1-1/4” bolt and one thin washer between the wheel and the body of the machine, as the picture shows. Place another washer on the other side of the wheel as well.

ON NON-STITCH REGULATED MACHINES
Repeat the wheel installation procedure for the rear left wheel.
ON STITCH REGULATED MACHINES
Remove the bolt and locknut holding the wheel and sensor bracket.
While working on the rear left wheel, keep the spring on the sensor bracket at its original position.
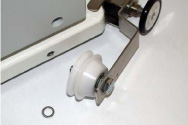
Mount the sensor bracket on the 1-1/2” bolt by the enclosed low profile locknut. Tighten the locknut enough to keep the bracket aligned, but freely moving. Put the wheel on the bolt as the picture shows. Put one thin washer between the wheel and the body of machine.
Mount the wheel/sensor assembly on the machine. Tighten the bolt, so the back of the locknut holds the wheel firmly. Check the looseness of the bracket and adjust the locknut if necessary.
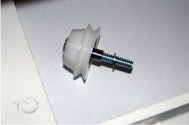
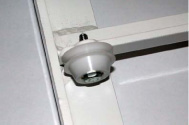
Remove the right front and back wheel. Install the EdgeRider wheel with the sliding hub (pictured to the right) using the 1-1/4” bolt and one thin washer between the sleeve and the machine.
INSTALLING THE WHEELS ON THE CARRIAGE

ON STITCH REGULATED MACHINES
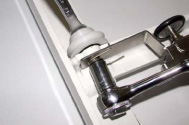
Remove the wheel/sensor assembly from the front of the carriage. Remember the position of the washers and spring.
Install the sliding hub wheels on the front of the carriage. For the sensor side use the 1-1/2” bolt. Make sure that you put a thin washer between the sleeve and the carriage.
Drive the bolt into the threaded hole on the carriage. Mount the washers, the spring and the locknut in their original order. Hold the bolt from turning and tighten the locknut enough to keep the bracket aligned, but freely moving.
 ON NON-STITCH REGULATED MACHINES
Install a sliding hub wheel on the front of the carriage, using a 1-1/4” bolt, putting a thin washer between the sleeve and the carriage.
Install the remaining sliding hub wheel on the other side of the front of the carriage, using a 1-1/4” bolt, putting a thin washer between the sleeve and the carriage.
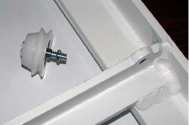
Install the rear wheels using 1-1/4” bolts, putting one thin washer between the wheel and the carriage and one on the other side of the wheel.
The rear wheels should be positioned with hubs on the outside, as the picture shows.